How can I make sure that films will stick to walls that are painted with low-VOC paint?
According to the UASG
Many installers are grappling with a common question regarding the changing chemistry of paint, specifically the reduction of Volatile Organic Compounds (VOCs) by paint manufacturers. This alteration in paint composition has significantly impacted the ability of graphic films to adhere to these newer paints. However, there’s no need to lose hope. True to 3M’s commitment to innovation, we’ve thoroughly examined this issue and devised a solution that is both simple and cost-effective. The key lies in the preparation of the surface and dedicating a few extra minutes to test the adhesion of the chosen films. Follow our best practices to ensure a smooth and successful application of almost any wall film on nearly any painted surface.
Preparing the Surface
Start with the 3M™ Enhanced Adhesion Cleaning Method. This method, which involves an isopropyl alcohol (IPA) and water solution and two cleaning steps, will greatly increase a film’s adhesion to a low-VOC paint.
Prepare a cleaning solution with 70 percent IPA and 30 percent water (essentially rubbing alcohol) in a spray bottle.
- Soak a clean, lint-free cloth with the cleaning solution until it is dripping wet.
- Clean the test (or application) area with overlapping strokes. Especially in the first cleaning, you may notice some migrated paint particles on the cloth (see photo at right).
- Thoroughly soak another clean, lint-free cloth with the cleaning solution and wash the wall again. Researchers at 3M have found that cleaning the wall TWICE with a mixture of 70 percent IPA and 30 percent water can significantly boost adhesion for nearly any wall film applied to a painted substrate.
- Touch the wall immediately. It will feel cooler to the touch than an unwashed area, due to the alcohol in the cleaning solution. When it no longer feels cool, it is dry and you can proceed with the film adhesion test or, if you are ready, with the film installation.
Testing Film Adhesion
- Now prepare three strips of the same film for each of the films you plan to use for a given job. You’ll need all three so you can average the results of your test.
- Cut three 1-inch by 10-inch strips of the graphic film(s).
- Remove about 2 inches of liner, fold down one inch, and then punch a hole in the tab you’ve created
(see photo at right).
NOTE: It’s important to test each wall where graphics will be installed. Because paints can easily be color matched, you may not be able to tell if one wall of a room has been painted with a different formula than the others.
- Remove the liner and apply the test strips to the cleaned surface so the punched hole is at the top. Use the 3M™ Rivet Brush RBA-1 to go over the strips three times to ensure good adhesion.
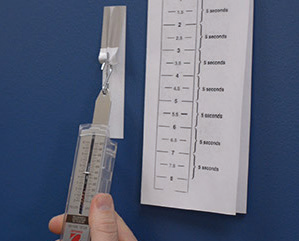
- After 15 minutes, remove the test strips by pulling with a spring scale attached to the film strip tab. Try to pull at a rate of 1 inch every 5 seconds and observe both the value on the scale and the smoothness with which the film releases from the wall
(see photo below).
Here is how to assess your test results:
- Unacceptable adhesion: The film measures less than 300 grams/inch on the scale and releases with little or no resistance.
- Acceptable adhesion: The film measures 300-1000 grams/inch on the scale and releases smoothly and consistently with some resistance. May be removable with heat/chemicals but may cause wall damage.
- Excellent adhesion: The film measures greater than 1000 grams/inch on the scale and releases smoothly and consistently with substantial resistance. Will cause wall damage if removed.
A film that pulls inconsistently or jerkily indicates that the adhesive is not making full contact with the substrate, even if it measures in the acceptable to excellent range. We do not recommend using a film that exhibits jerky removal.