In the competitive world of marketing, businesses are constantly searching for innovative ways to stand out. One highly effective yet often overlooked strategy is mobile advertising through vehicle wraps. By transforming your fleet into moving billboards, you can achieve unparalleled visibility while maximizing your marketing budget. The Peerless Furniture & Leather Gallery provides a perfect example of how impactful this approach can be.
Why Vehicle Wraps Work
Mobile advertising via vehicle wraps is an ingenious way to reach your audience in their daily lives. Unlike static billboards or digital ads that depend on specific locations or algorithms, a wrapped vehicle takes your brand wherever it goes—ensuring that your message reaches diverse demographics across cities, neighborhoods, and even highways.
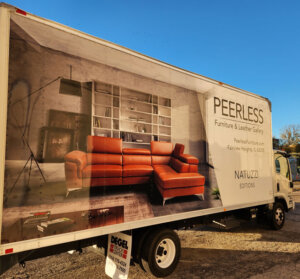
Consider Peerless Furniture’s truck wrap: it features bold branding and an eye-catching image of their signature Natuzzi Editions furniture, turning a simple delivery truck into a moving masterpiece. Wherever this vehicle goes, it carries the Peerless name and reputation, capturing attention and reinforcing their brand identity.
The Benefits of Vehicle Wrap Advertising
- Cost-Effective Marketing Vehicle wraps offer a one-time investment with long-term benefits. Unlike traditional ad placements that require ongoing payments, a well-designed wrap lasts for years, providing consistent exposure without recurring costs.
- Massive Reach Studies have shown that a single vehicle wrap can generate between 30,000 and 70,000 impressions daily. That’s significant exposure, especially in densely populated areas.
- Localized Targeting Whether you’re delivering furniture in Fairview Heights or driving through nearby cities, your branded vehicle is targeting potential customers right in your business’s service area.
- Professional Image A wrapped vehicle conveys professionalism and credibility. Peerless Furniture’s clean, stylish wrap not only advertises their business but also enhances their brand’s perceived value.
Making Your Brand Peerless
To truly harness the power of mobile advertising, your vehicle wrap should reflect your brand’s identity and values. Here’s how Peerless Furniture nailed their design:
- Clear Branding: The Peerless name and logo are prominently displayed, ensuring immediate recognition.
- Striking Visuals: The wrap features a high-resolution image of a sleek, modern living room set. This instantly conveys the quality and style Peerless offers.
- Strategic Messaging: Including their website and location invites potential customers to learn more or visit their showroom.
The Road Ahead
In today’s fast-paced world, where attention spans are short and advertising spaces are crowded, vehicle wraps are a game-changer. They turn every mile traveled into an opportunity to showcase your brand—a strategy that’s both practical and impactful.
For businesses like Peerless Furniture, mobile advertising isn’t just a marketing tool; it’s a statement. It’s about being seen, remembered, and trusted. So, whether you’re a local startup or an established brand, consider making your advertising as Peerless as your business.